Fairy Fhiona and Ribbon Flower Tutorial
Hi everyone! It's my turn to post on the Your Next Stamp Blog, so I put together a little tutorial on how to make a Gathered Ribbon Flower.
A few supplies you will need:
scissors, saddle-stitch ribbon in green and another color of your choice (I used 3/8" ribbons), ruler, glue dots (not pictured - I used 1 large, 2 mini)

The first step is to cut your ribbon... no need to be exact. I cut my pink ribbon to about 8 inches (this will be the flower), and the green ribbon to about 1 1/2 inches (this will be the leaf).
Take the 8 inch ribbon, and pull out the stitching a little from each end (make sure you are pulling at the stitching running along the same side of the ribbon).
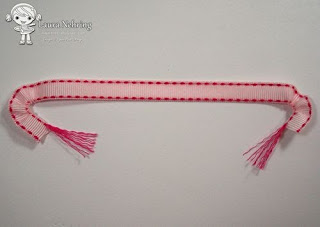
With one hand, put the two ends together, and pinch the loosened stitches where they meet the ribbon.

With your other hand, grab the stitches hanging below, and pull slowly to gather the ribbon.
Once the ribbon is gathered, tie the loose ends of the thread together. The tighter you can get it, the better.

After you've tied a knot, just cut the excess string.

Now we are ready to make the leaf. Take the green ribbon (cut to about 1 1/2 inches) and stick one end of it onto a large glue dot. I buy the glue dots on a roll, so I just cut one off, keeping the backing in place. Once the ribbon is in place, stick a mini glue dot on top.


Fold the other side of the ribbon over, sticking it to the mini glue dot. Add the other mini glue dot on top.

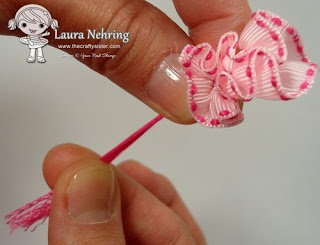
Now you can stick your gathered ribbon on top of the leaf. Make sure to tuck the raw edges of the ribbon underneath, then smoosh it around a bit till you like the look of it!
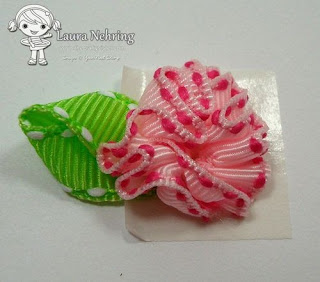
And now you have a simple little embellishment ready to add to your project.

Supplies: Hammermill White CS; Wausau Black CS; Doodlebug Patterned Paper; Memento Tuxedo Black Ink;
Circle Nesties; Stardust Stickles, Ribbon, Glue Dots, Copics
Copics Used:
Skin - E11, E00, E000, YR0000, R00
Hair - E37, E35, E33, E31
Wings - RV000, RV0000
I hope you like my tutorial, and will make some of these easy flowers for yourself!
Thanks for stopping by!
Linking up at:
Follow Me:
Current Design Teams:

Karen Aicken
Kulbir Kirkland
Laura Nehring - that's me!
Meghan Kennihan
Sam Olden
Christy - Owner & Artist
Laura - that's me!
Nicola
Comments
-Samantha
RSS feed for comments to this post